Highlights & Quickstart
GenomeSpace bridges the gaps between GenomeSpace-enabled bioinformatics tools, making it possible for you to move data smoothly between these tools, leveraging the available analyses and visualizations in each resource. GenomeSpace allows you to store your data files in the cloud and provides necessary file format transformations whenever you select an analysis or visualization within one of the tools.
-
Tools are applications that allow users to either perform analyses on or visualize data. You can send files to these applications from GenomeSpace and save files from those applications to GenomeSpace.
-
Data sources are repositories of data files that are linked to GenomeSpace. Those with access to the data can use GenomeSpace as a conduit to further analyze the provided data. Data sources may additionally provide analysis tools within their site for analysis of their data but not of outside data. Data sources are also listed under the Tools menu and are referred to grouped as tools.
-
Recipes are step-by-step instructions of two types: (1) they outline how to perform tasks in GenomeSpace such as loading or moving data, and (2) show how to perform specific integrative bioinformatic data analyses using GenomeSpace tools.
Highlights of GenomeSpace functionality are outlined below with related links. Details follow in this User Guide.
-
A conduit for multi-tool bioinformatic analyses
-
A file management hub
-
30 GB personal storage included with account
-
Access files stored in Dropbox, Amazon S3, or Google Drive from any GenomeSpace-enabled tool.
-
An environment facilitating collaborative research
-
intuitive file sharing to individuals, groups, and the public
-
share private tools with groups
-
A data access resource
-
explore and access data provided by data sources listed under the Tools menu
-
access data via mounted Amazon S3 bucket, such as from the public 1000 Genomes Project and the Human Microbiome Project.
-
import data via URL from public servers such as the Gene Expression Omnibus (GEO)
-
test example analysis workflows using data under Public/SharedData/Demos
GenomeSpace also includes the ability to link your GenomeSpace login to user accounts in tools allowing easy single sign-on access. Learn how to link accounts in the Tool Guide. For more on the concepts and team behind GenomeSpace see What Is GenomeSpace? and check out our Presentations and Videos. Tool and data portal developers interested in GenomeSpace-enabling their projects should see Resources for Developers. For troubleshooting questions, see the FAQ. For additional questions and to provide feedback, please post to the forum or contact gs-help@broadinstitute.org.
For questions about specific tools we refer you to the help available at the tool websites, the Biostars forum, and the SeqAnswers forum.
Quickstart to the User Interface
Here we outline the main elements of the user interface to help you get started. More detailed instructions follow within this User Guide.
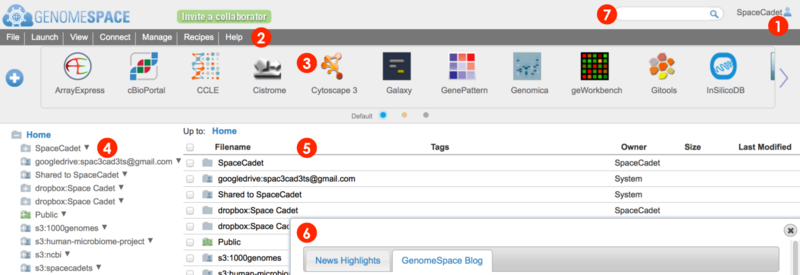
When you log in to your GenomeSpace account, you will be redirected from the home page to the user interface shown below (Screenshot 2015.02.06)
-
User account profile, history, and logout
-
Menu bar for management, analysis, and information. Many functions are also accessible by alternate methods, i.e. by right-click menu.
-
File and View menu to manage files and folders
-
Connect menu to link Dropbox, Amazon S3, and Google Drive accounts for access from your GenomeSpace account
-
Launch menu to open a specific tool, either by going to the tool's website or by opening the desktop application using Java
-
Manage menu to add and edit your groups and private tools
-
Recipes menu to view GenomeSpace recipes in a new browser tab
-
Help menu to view the User Guide and other helpful information
-
Tool bar for launching GenomeSpace tools and data sources.
-
Wide arrows
 at edges of toolbar scroll to next set of tools at edges of toolbar scroll to next set of tools
-
Hover mouse over tool icon and click small downward triangle
 that appears to access menu of specific tool functions and information that appears to access menu of specific tool functions and information
-
Click directly on a tool icon to launch the tool
-
Click blue plus button
 to open the tool catalog to customize the toolbar to open the tool catalog to customize the toolbar
-
Click small selector buttons at bottom of toolbar
 to display your customized alternate toolbars to display your customized alternate toolbars
-
Left directories panel gives an overview of directories and lists your GenomeSpace user folder, Shared to folder containing items from other users, and the Public folder containing items shared to all users.
-
This window also displays any connected storage such as Dropbox & Google Drive and mounted Amazon S3 buckets.
-
Click on a folder to expand.
-
To indicate an item is shared, folder and file icons display people icons. Sharing to select users displays one
 , while public sharing displays three , while public sharing displays three  . .
-
Access action options for folders from the File menu or from the pop-up menu called by right-clicking on a folder.
-
The main files area lists files and folders within a selected folder.
-
Clickable file path breadcrumb at top for easy navigation.
-
Refresh the browser window to update file listings when returning to GenomeSpace from tools.
-
Access action options for files and folders from the File menu or from the pop-up menu called by right-clicking on an item.
-
When you log in, dialog boxes and other elements occasionally appear.
-
Your feedback in the survey box helps improve and maintain funding for GenomeSpace
-
A What's New box highlighting news and updates to the system via blog are posted as we make changes
-
New tools in the tool catalog are marked by a red circled number next to the tool catalog button
-
A search field that matches file, directory, and tool names, descriptions, and tags.
-
Results for files and tools are listed separately with file hits displayed first. Click on Tools (#) at top of area to switch display results.
-
Searching is insensitive to case and matches strings within words
Quickstart an analysis
First, make files available to GenomeSpace with one of the following methods.
-
drag-drop data files from your desktop into your user folder in the browser
-
import files by URL from the menu File>Import from URL
-
send files from a GenomeSpace-enabled tool to your GenomeSpace account
-
mount Dropbox, Amazon S3, or Google Drive files using Connect from the menu bar
When you launch a tool on a file, file formats are converted automatically. Additionally convert the format of a selected file using File menu>Convert.
Launch a tool to analyze files using one of the following methods.
-
drag-drop the file(s) onto a tool in the toolbar
-
select the file(s) and go to menu Launch and select a specific tool
-
select file(s) then click on the tool in the toolbar
-
select file(s) then click on the files and select a tool from the pop-up menu
|

