|

|
Customize the interface, the tool catalog & tool tags
You can customize within GenomeSpace at two conceptual levels that are reflected in the toolbar.
-
The visual interface you encounter when you sign in to your account.
-
For example, display only the limited subset of tools you use on a daily basis in your toolbar.
-
In functionality.
-
In analyses by private tools that propogate to shared users. For example, add a private tool that runs your preferred analysis algorithm and is shared only with members of your laboratory. See Manage Groups & Tools for details.
-
In the user interface by annotations of tools that propogate to shared users. For example, add a tag and tag descriptor to a public tool, such as IGV, which will be seen and can be searched against by all GenomeSpace users.
Customization settings will persist such that whenever you log in to GenomeSpace, the toolbar will display according to your last set preferences.
Access user interface customization options (i) directly from the browser interface and (ii) more extensively from the tool catalog. Each approach has unique customization options as well as some duplicated options (asterisked in table) and are described in detail in the following sections. This page describes only customization related to the user interface. For information on adding and editing private tools, see Manage Groups & Tools.
|
(i) browser interface |
-
Reorder tools, hide* tools, and resize the toolbar.
-
To view and edit tags and tag descriptors for any tool, click the downward triangle next to the tool and select Details** from the menu.
-
To edit a private tool you administer, click the downward triangle next to the tool and select Edit*** from the menu. Alternatively, from the menu bar, select Manage>Private tools to add, delete, or modify/edit*** a private tool you administer. See Manage Groups & Tools for details.
|
|
(ii) tool catalog |
-
Add and customize alternate toolbar displays.
-
Remove/hide* or add tools to a toolbar.
-
From a tool's panel, select More details** to view and edit tags and tag descriptors.
|
Customize the toolbar from the user interface
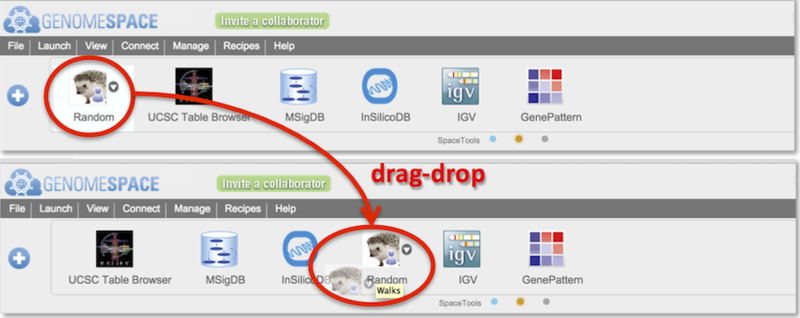
-
Reorder tools by drag-dropping them along the toolbar (Screenshot).
-
To remove a tool, hover mouse over a tool and click on small downward triangle that appears to the right of the tool, and select Hide from the menu.
-
Adjust the height of the toolbar, with tool icons sizing accordingly, by dragging by mouse the bottom edge of the toolbar upwards or downwards.
-
As you hover the mouse over the bottom of the toolbar, between the gray and white edge, the pointer will display as a downward arrow.
-
Click and drag the downward arrow to adjust the height of the toolbar.
-
At the narrowest height, tool names disappear and only the icons display.
Customize the toolbar from the tool catalog

Open the tool catalog by clicking the  button on the left of the toolbar (circled in red in Screenshot). The tool catalog will display akin to the screenshot below. button on the left of the toolbar (circled in red in Screenshot). The tool catalog will display akin to the screenshot below.
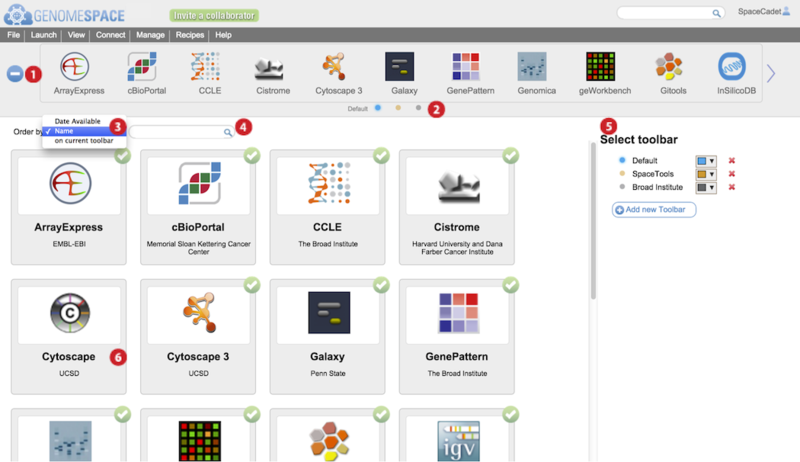
-
Press the blue + or – button to open or close the tool catalog.
-
Alternatively, from the menu bar, select View>Customize toolbar to open the tool catalog.
-
Click on small selector button corresponding to toolbar you wish to edit.
-
The displayed toolbar's name appears to the left of the selector buttons.
-
Adding additional toolbars adds selector buttons here.
-
Order the tool catalog tool panels by selecting an option from the dropdown menu.
-
By date starts with the newest tool first. This is the default display order.
-
By name is alphabetically descending.
-
On current toolbar puts all the tools absent from the toolbar first, then alphabetically by name.
-
Display filtered tool catalog tool panels by typing match terms in the search field.
-
Search is against tool name, tool tags, tool description, and tool tag-associated descriptors.
-
Add a new toolbar by clicking Add new toolbar.
-
Edit a toolbar name by hovering mouse over the name and typing.
-
Selecting a toolbar here also switches the tool catalog display to reflect its contents.
-
Change the color representing the toolbar by clicking on the downward arrow and selecting a color.
-
Delete a toolbar by clicking the red X next to the toolbar name.
-
In the main tool catalog, for the selected toolbar, tool panels with green circled checkmarks are displayed in your toolbar while those without are not.
-
In the example, Cytoscape 3 is checked but the original Cytoscape is not. This is reflected in the toolbar.
-
Hover mouse over tool panel for a brief description, options for more details, to add the tool, or to remove the tool from the specific toolbar.
-
The more details link gives a description of the tool, date added, URL address, and lists the tags. Additionally, special requirements and help URL links may be listed. For the most current information on a tool, use the links on the Tools page.
Add and edit searchable tool tags and tag descriptors

Searches from the main searchbar or tool catalog searchbar match to tool names, tool descriptions, tags, and tag descriptors. Searches are case-insensitive.
You can add your own tool tags and tag descriptors for any tool. These are viewable by anyone with access to the tool. You can delete or edit tags and tag descriptors only for tags you had added. You cannot remove tags placed by another user.
-
Within the tool catalog, hover mouse over a tool panel and select more details.
-
Alternatively, from the toolbar, click the downward triangle next to the tool and select Details from the menu.
-
Information about the tool is displayed including tool description and tags (circled). Click add/edit tags.
-
Hover mouse over a tag to display the tag-associated tag descriptor in a yellow box.
-
Add a new tag and associated descriptor by typing into the tag and description fields. Press Apply Tag.
-
To edit an existing tag, click on the tag to display its information within the fields. Edit the fields and click Apply Tag to save.
|

