Manage files & folders
The left directories panel and main files panels show the contents of your account folders. From here, you can manipulate your data files in a number of ways detailed extensively in the User Interface section or broadly and selectively on this page. More specialized file management features, Share data, Preview & Heatmap, and Tag & Search, follow in separate pages.
Manage folders
|
You can manage your folders by clicking the triangle next to a directory name, by right-clicking on the folder, or by selecting a folder and using the File menu:
-
Upload files from your local machine or import by URL address into a folder
-
Create subdirectories
-
View the URL link to the folder
-
Share the folder with colleagues or the public
-
Tag, rename, copy, or move a folder
-
Create an archive of a folder
-
Delete a folder and all its contents (from main files panel)
-
Connect or disconnect storage devices which appear as directories
|
Manage files
|
You can also manage individual files by right-clicking the file name or by using the File menu for selected multiple files:
-
Preview text-based files and heatmaps for select file formats
-
Extract rows and columns from a tab- or comma-delimited file and save to a new file
-
Convert the file to another file format
-
Download the file to your local machine
-
View the URL link to the file
-
Share the file with colleagues or the public
-
Tag, rename, copy, or move the file
-
Delete the file
|
Store files on your GenomeSpace account
To store a file in your account, import by (i) drag-drop or (ii) URL address. For drag-drop import of individual files ~1GB or larger, we recommend using Firefox over Chrome as explained in FAQ1.3. Additionally, consider accessing files via a linked external storage drive containing the files as outlined in Connect Storage and Connect S3 Bucket.
|
(i) drag-drop file import |
Drag-and-drop the file from your desktop to the target GenomeSpace directory.
-
Make sure to use a compatible browser as defined in FAQ1.3.
-
An older feature, the Java Uploader, is no longer supported.
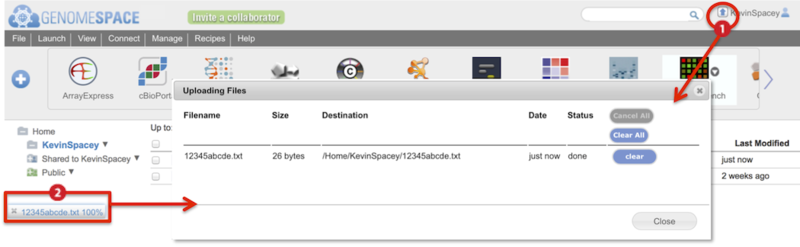
Two indicators show the upload progress of a drag-and-drop file (Screenshot):
-
Animated arrow by your user name

-
Percentage progress bar at the bottom of the browser window
Clicking on either of these brings up a dialog box with more details on the progress of the file upload (inset).
-
This dialog box can also be viewed from the View menu>Recent uploads.
-
Clicking on the link either under the Filename or Destination columns opens the directory containing the file.
|
|
(ii) URL address file import |
-
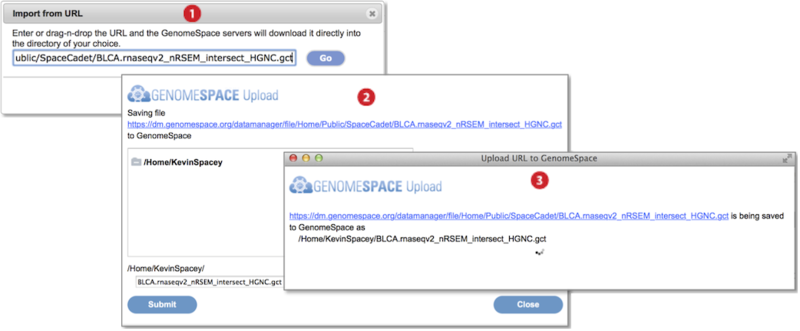
Go to File menu and select Import from URL. Provide the URL address in the textbox by typing, pasting, or drag-dropping the URL. Press Go. (Screenshot above 2015.1.27)
-
In the dialog box that appears, select the destination folder for the import and optionally edit the file name. Press Submit.
-
A third dialog box shows import is ongoing and closes once complete.
-
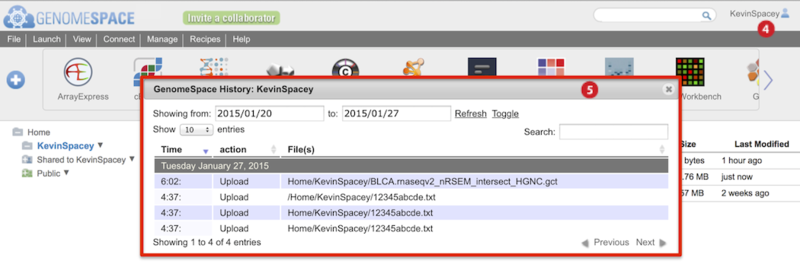
To view history of uploads, click on your user name and select History from the menu (Screenshot below 2015.1.27).
-
The History dialog box appears (boxed red) and marks uploads as Upload in the second column.
|
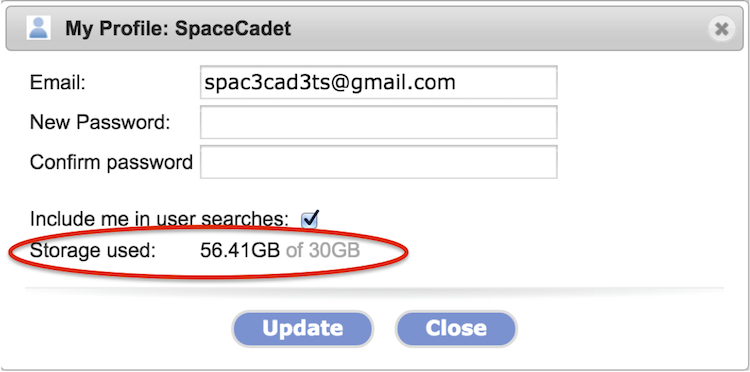
Each GenomeSpace account has 30GB of storage
The 30GB storage quota took effect in the summer of 2014. You can check how much storage you are using by clicking on your user account name in the upper-right and selecting Profile from the menu. The storage used is circled in the screenshot below.
-
When you are over the quota, you are reminded to reduce storage each time you log in.
-
Any attached storage, e.g. Dropbox, S3 bucket, or Google Drive, does not count towards the quota. For more details, see Connect Storage and Connect S3 Bucket.
-
If your project requires additional storage, specify your needs to gs-help@broadinstitute.org.
GenomeSpace allows you to store your data securely in the Amazon Elastic Compute Cloud (Amazon EC2), which is a web service that provides resizable compute capacity in the cloud.
Archive files to reduce storage
When planning your analyses, note if your bioinformatic tools accept input of compressed formats so you can plan your storage needs efficiently. A number of tools take specific compressed formats as input into their offered bioinformatic algorithms. You can thus store files in a compressed or archived format without loss of utility and increase your available storage.
You can perform additional compression for archiving purposes directly in GenomeSpace. GenomeSpace supports in-browser archiving and expansion of ZIP, TAR.GZ (TGZ), and TAR formats.
-
Please let us know of additional compression formats that would aid in your research.
-
Because BAM (binary of SAM) format files are already compressed to binary format, additional compression may be negligible depending on the extent of duplicated reads and whether they are marked.
When archiving files and folders or expanding archived files in GenomeSpace, original files and folders remain intact and you can remove these separately. For larger footprint folders, we recommend archiving contents in smaller groupings. Follow instructions below starting with steps outlined in the table.
|
|
a single item |
multiple files |
|
Archive files and folders |
-
right-click the item and select Create Archive from the pop-up menu
-
an archived file with the same name, with option to edit, is created
|
-
check the files and select File menu>Create Archive
-
creates a single archived file, named archive with option to edit name, containing the multiple files
|
|
Expand archived file |
-
right-click the item and select Expand Archive from the pop-up menu, or check the file and select File menu>Expand Archive
-
A folder with the same name is created and contains the expanded contents
|
|
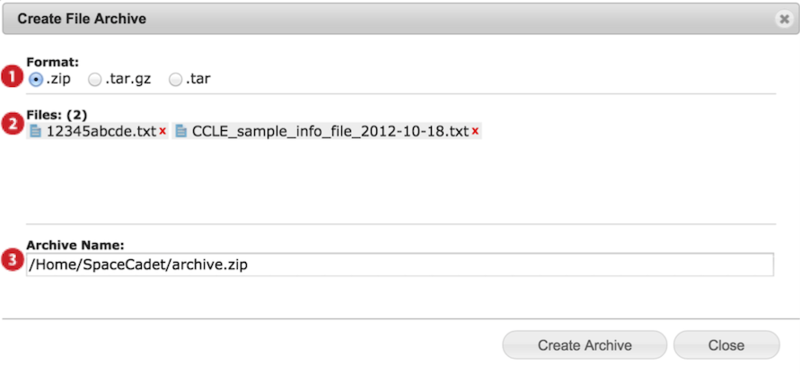
When you archive, a dialog box appears (screenshot below).
-
Select preferred archive format ZIP, TAR.GZ or TAR.
-
Confirm files to be archived and remove undesired files by clicking on the red x.
-
Edit archive file name and location and press Create Archive.
-
Available locations are your GenomeSpace user folder and subfolders, linked Dropbox, and linked Read/Write S3 buckets.
-
The progress of archiving, and similarly for expansion, is shown with a green percentage bar
 at the bottom of the browser window. at the bottom of the browser window.
-
Once complete, the notification turns gray
 . Clicking on the notification opens the folder containing the new archive file. . Clicking on the notification opens the folder containing the new archive file.
-
The notification turns red
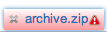 if an error occurs. if an error occurs.
Download files to your local machine
Two features of GenomeSpace obviate the need for direct file downloads from the GenomeSpace interface.
One is the ability to link cloud storage devices, i.e. Dropbox, Amazon S3 Buckets, and Google Drive, to your GenomeSpace account. These devices already provide backup of your files in their architecture and in the case of Dropbox and Google Drive allow syncing to your local machine. Meaning you can access the contents of these drives from your desktop file manager even when offline.
Second is the move by bioinformatic tools, especially those GenomeSpace-enabled, to provide online access to their analyses and the ability of the analysis tool to access data in your GenomeSpace account or via URL address. For tools that are not GenomeSpace-enabled, you can change the share setting of files and folders within your account to Public to allow URL web access to the data without authentication. GenomeSpace is particularly useful when the bioinformatic tool requires URL addresses to preserve file extensions. A URL link for the same file from your Dropbox or Google Drive account will not preserve such file extensions. For example, when providing the Integrative Genomics Viewer (IGV) tool a URL address of a file, it can process the GenomeSpace generated URL link to a file within a linked Dropbox account. Lastly, GenomeSpace allows you to share data in your account with the public and with colleagues either within the GenomeSpace environment or by shared URL link as detailed in Share data.
If your required file manipulations necessitate downloading and then reuploading the transformed data into GenomeSpace, we would like to hear about it. Posting to our forum may inform you of tools that can accomplish what you need online or lead us to offer these file manipulation features within the GenomeSpace environment.
To download files from GenomeSpace:
-
For multiple files, check the files and select File menu>Download.
-
Alternatively for a single file, right-click on the item and select Download from the pop-up menu.
-
To download all files in a folder, open the folder to display contents in the main files panel. Check the box next to the column headers to select all the files and then select File menu>Download.
-
Download of an entire directory and its directory structure is not supported.
The download protocol for your specific browser activates and notifies you of the download. To check your download history, follow these steps:
-
Click on your user name in the upper-right corner and select History from the menu.
-
Be sure the date range reflects the date of the download or edit the date range and press Refresh.
-
Downloads are marked as Read in the second column under action.
Although no longer supported, we previously offered a folder downloader, called the recursive downloader, in September of 2014, in the blogpost Recursively downloading files from GenomeSpace.
Move and copy files within your directory structure
Copy and move functions are provided together and have the following constraints.
-
Duplicate item names are not allowed in a single folder. Edit item names within the Copy/Move dialog box.
-
Copy from any type of directory to directories for which you have read/write permission.
-
Move to and from directories for which you have read/write permission.
-
Attempted moves from write-only directories to read/write folders will automatically default to a copy function.
|
move files or folders |
-
Drag-drop the file/folder into another directory in either the main files panel or the left directories panel.
-
Right-click the file/folder name and select Copy/Move from the pop-up menu. Select the destination then click Move.
-
Check the file(s)/folder and select File menu>Copy/Move. Select the destination then click Move.
|
|
copy files |
-
Press and hold down the shortcut* key on your keyboard while dragging-and-dropping the file into the directory in which you want a copy. Select the destination then click Copy.
-
*PC users use CTRL, SHIFT, or ALT
-
*Mac users use OPTION or SHIFT
-
Right-click the file name and select Copy/Move from the pop-up menu.
-
Check the file(s)/folder and select File menu>Copy/Move. Select the destination then click Copy.
|
The screenshot below gives an example of a copy/move.
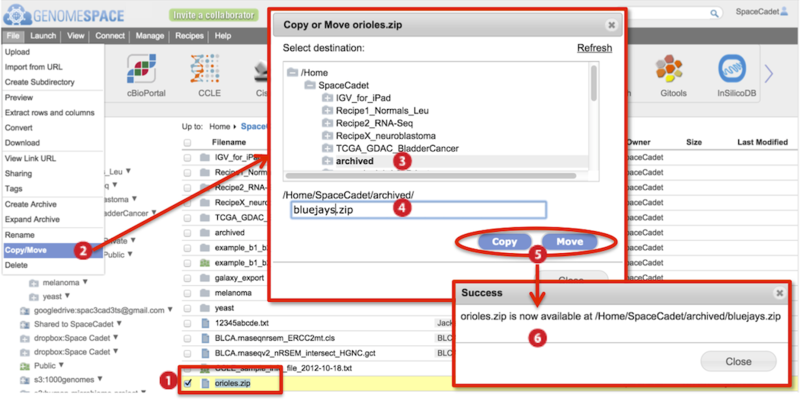
-
Check to select file(s).
-
Go to File menu>Copy/Move.
-
In the dialog box that appears, select the destination folder in the directory structure.
-
Also edit the file name. Duplicate file names are not allowed in the same folder.
-
Click either Copy or Move.
-
Progress of copying and moving is shown by a percentage progress bar
 at the bottom of the browser. at the bottom of the browser.
-
Hovering mouse over the progress bar displays the destination file path in a yellow box.
-
A new dialog box informs you the process is complete.
|

